

After a long school term, Cool Brain is back with more exciting activities. There is no better time to have fun and get your hands dirty than the school holidays. But they can be a bit boring when you have nothing to do. We’re here to keep you busy with fun games and experiments, fresh off the block. This summer holidays look a bit drenched in rain. So board games and indoor fun are going to take over. While we are at it, how about learning a bit of coding and a few STEM experiments to catapult us into the future of learning?
Playing with Microbits.
In today’s world, technology is everywhere. It has become part of our day-to-day lives and will be forever. There are countless uses for technology, and two of these are fun and learning! Microbits are literally mini-computers. They apply your STEM learning (science, technology, engineering and maths ) by making it more enjoyable and hands-on and test your creativity, improve the problem-solving ability and enhance the critical analysis techniques you have learnt, all while making it more exciting for you.
The Microbit we need to make the name tag has a LED light display and two buttons. You can code it to do so many things, a few of which we will be coding. Some of the feats it can do include lighting up with a smiley face to make your day, playing games and showing text on the screen.
What you need
To make your name tag display unit you need
- The Microbit which comes prepacked with the Microbit, a battery holder with cable attached, USB cable and 2 AAA batteries. Please do not use your own battery holder because the cable may not connect to the Microbit.
- A laptop or computer
- A piece of cardboard
- Glossy paper
- Scissors
- Markers/Colour pencils
- Nails or screws

How to set up the Microbit
- Hold the Microbit so the gold circles at the bottom are closest to you. Keep the LEDs facing down. At the top, there are 2 plug points. One is white and one is silver. In between is a button, that is the on button.
- Plug the battery cable into the white one. It is one way so if it is not connecting, don’t force it, just turn it around with care and try again.
- Now press the on button. Don’t press it again until you have waited 20 seconds. The screen will light up and you have turned it on!
- Connect one end of the USB to the computer and the other end to the silver plug point.
Your Microbit is all set to be coded!

Coding your Microbit!
You can match these instructions to the photos below.
- Find microbit.org and open it. Your screen will look like number 1 below. Did it? Good job! Open “Let’s Code”
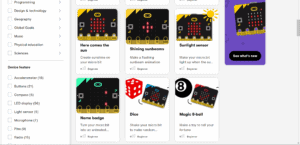
- Scroll until you find Beating Heart, Emotion Badge and Dice. Open “Explore MakeCode Projects”
- Found it? From here, scroll until you find Name Badge. Click on the black title.
- Awesome! Here you can choose to follow the tutorial or use ours. There is no difference in the end product but with ours, you get to understand and handmake the code. If you want theirs, this is your last stop and you can follow their instructions from here onwards. For our guidance, scroll to Step 2 and click on “Open in MakeCode” and we can make your own brand new code.
- Fantastic! Drag the forever block onto the tab of options and drop it. From here we can make our own code and understand it better. Optional- If you want to mess around with the code, you can whenever you want because it is your code.
- Go to the block called Basic and find a loop called forever. This will repeat whatever you put in the block until the Microbit turns off.
- Find “show string “Hello!” in Basic and place it inside the loop. Click on “Hello!” and type your name in. This will display your name forever until the Microbit turns off. If you want to show a smiley face or love-heart, just go to “show icon” and click whatever you like.
- In Basic, you will find a block called “clear screen”. Add this in the loop so the LEDs turn off after spelling your name.
- Lastly, go back to Basic and find “pause ms 100” you can change the timing to whatever you want but we will put 2000. Now the Microbit will display your name, wait 2000 milliseconds and display your name again!
- Spectacular! Your code is done, but wait! There’s one more thing. Click on the purple button that says Download and follow the instructions. Now unplug the USB once your screen closes and plug the battery back in. Once you turn the Microbit on, your name tag display will work!
-

- 1
-

- 2
-
- 3
-

- 4
-

- 5
-

- 6
-

- 6b
-

- 7
-

- 7b
-

- 8
-

- 9
-

- 10
-

- 10b
Putting it together.
Your name tag is ready but you now need to make the display unit. With your cardboard, cut out a small rectangle which double the size of your Microbit. Leave a bit of space for decorating and keep the Microbit off for now. Cut a piece of glossy paper as big as the cardboard and glue it on. Then fold the cardboard in half and press it down. Make sure it stands up properly. Decorate it however you like on the edges and put the Microbit with the LEDs facing up in the middle. slide the battery inside. Use your parent’s help and gently fix the Microbit unit on to the board. Be aware that the Microbit is very sensitive and a mini-computer. We have fixed ours with small pins that run through the gold circles as you can see. Our name tag display unit is done!
I hope you enjoyed coding your Microbit as much as I did. You can make so many more activities and games on your Microbit using the website or by yourself. Tell us how your Microbit went and follow me on Instagram at coolbrain5. Be sure to check out our new posts coming up soon! Stay safe and have fun!
Disclaimer
This is not a sponsored post encouraging you to buy anything from the listed links, but an independent experiment conducted to keep our curiosity levels at premium.


Nice.
Wow Ankita. Your experiments are amazing.